T H E   F L A M E   T R E E   B L O G

The Expert Advice, Made Easy Blog

Matt Knight

Recent Posts

Running Made Easy: Hydration

Posted by Matt Knight

made easy, running tips,

Water accounts for about 60 per cent of body weight in adult males and 50–55 per cent in females. Lean muscles and the brain are around 75 per cent water, blood is 81 per cent and even bones are 22 per cent. Water fuels every part of the body and, without sufficient water, things can quickly go wrong.

The Importance of Water

It is almost impossible to overstate the importance of good hydration to a runner, so taking a few minutes to understand a little of the science behind this is highly recommended.

What Does Water Do?

Water serves several key functions in the body:

  • Controls weight; preventing confusion between hunger and thirst.

  • Flushes toxins from the body.

  • Moisturizes the skin and helps maintain elasticity.

  • Helps maintain cushioning and lubrication in the joints.

  • Reduces the risk of kidney and bladder infections.

  • Improves circulation.

  • Regulates body temperature.

Why We Sweat

Unlike other animals, which roll around in mud (pigs) or flap their ears (elephants), humans regulate their body temperature via the sweat mechanism. In hot conditions or during exercise, sweat glands – some 2.6 million in the average adult – produce a fluid that is transported to the surface of the skin, where it evaporates and cools us down.

 made easy, running tips,

How Much Do You Sweat?

The amount of sweat produced varies between individuals, and is also dependent on both the duration of exercise and weather conditions. However, as a rough guide, during a moderately fast run on a warm day, a person will sweat in the region of 500–600 ml per hour. 

The amount we sweat is directly proportional to the amount of water that should be replaced, so it can be useful to more accurately calculate a ‘sweat rate’. Do so as follows:

  1. Make a note of how much water you have consumed (in millilitres).

  2. Wipe excess sweat from your skin and weigh yourself again.

  3. Sweat loss (in millilitres) = body weight before exercise (in kilograms) – body weight after exercise (kilograms) + water consumed during exercise.

  • Top Tip: For really accurate sweat rates, repeat the sweat test a few times and take an average. It can be useful to know your sweat rate for various weather (temperature).

made easy, running tips, Before a Run

Make sure that you are adequately hydrated before any form of exercise – pay particular attention if you are running first thing in the morning, as your body slowly dehydrates overnight. Avoid coffee and alcohol, as both contribute to dehydration, but, equally, avoid excessive water, as this will ‘slosh’ uncomfortably on the run and can lead to frequent toilet breaks.

On the Run

Making a note of your sweat rate, ensure that you are replacing enough fluids on an hourly basis. Drink little and often – sipping regularly from a bottle will encourage the habit of good hydration. If you wait until you feel thirsty, you’ve left it too long.

Post-run

Avoid the temptation to gulp down water after a run, and in particular avoid ice-cold water, as this may cause stomach cramps. Continue to drink regularly through the day and, again, avoid coffee and alcohol.

Salting it Out

Although plain water goes a long way to rehydrating the body, a great deal of salt (a combination that includes sodium, potassium and magnesium rather than the ‘table’ variety) is lost during exercise. It is important, especially on long runs, to replace these as quickly as possible. Most sports drinks include these body salts, but it is also worth using salt-replacement tablets, which can be dissolved in a regular water bottle.

Sports Drinks

Although basic sports and running drinks have been around for half a century, the market has grown beyond all recognition in the last 10 years, despite the fact that they remain a fairly simple mix of carbohydrates (energy from sugars), electrolytes (body salts), water and flavourings.

RUN 1894web

Which Tonic?

Whatever else a sport drink may offer (an added caffeine kick, for example), there are three basic types:

  • Hypotonic drinks: These can be absorbed much more quickly than plain water because their ratio of carbohydrates and electrolytes is less than the body’s. They do not offer the same energy surge as isotonic or hypertonic drinks, but they do replace fluids quickly and are best suited for use during low-intensity and hot runs.

  • Isotonic drinks: These contain a balance of carbohydrates and electrolytes near-identical to that of the body. They are absorbed at about the same rate as water, but have the advantage of containing sugar-based energy. They work best for higher-intensity workouts, strenuous runs or races, and deliver a greater energy boost.

  • Hypertonic drinks: These are best suited to post-exercise recovery, as they are absorbed relatively slowly but help to replenish energy and replace salts lost through sweating.

Is Caffeine Good for Runners?

Some sports drinks and virtually all ‘energy’ drinks contain caffeine – usually about the same amount found in a single shot of espresso. There is some evidence to suggest that small doses bring benefits such as increased VO2Max (the body’s ability to absorb oxygen) and even lactic threshold (the point at which your muscles tire), but these are short-lived. Caffeine also produces a rush of energy, but this too is short-lived, and too much caffeine can cause a range of less desirable results, including raised blood pressure and upset stomachs.

RUN 1904web

  • Top Tip: Avoid more than a single cup of coffee before a run, as it can contribute to dehydration. Be aware that tea, even some herbal teas, contains a percentage. 

This post is based on an extract from our bestselling book, Running by Justin Bowyer (ISBN: 9780857753892) – where you can find more on the above and further help and advice on running. Have a look on amazon by clicking here.

  • Make sure you avoid the 6 hydration mistakes on race day, by clicking here.

  • What's better, bottled water or tap water? To find out just click here

  • To keep up-to-date on our latest posts and download a free Made Easy ebook click the link below and sign up.

Expert advice made easy, blogging, photoshop, social media, twitter

Topics: long distance running, made easy, running tips, hydration, middle distance running

Running Made Easy: Staying Safe

Posted by Matt Knight

running made easy, staying safeSafety should be your number-one priority on every run. Running safety is mostly common sense, but even a momentary lapse can spell disaster and taking some simple steps will ensure a safe and happy run.

Consider these helpful pieces of advice from our experts, ensuring your running experience is safe and enjoyable.

  • MP3 players: Only ever listen to music on a run when you are certain it is safe to do so, and never when running in the road.

  • Run against the traffic: If you are running in the road, you are vulnerable. Always run on the side of the road where you are facing oncoming traffic.

  • Be seen: Running at night and in poor visibility means wearing high-visibility clothing and even small clip-on lights. Make yourself as visible as possible.

    running made easy, make yourself visible

  • Stay in contact: When exploring more isolated routes, take a mobile phone. Public phone boxes aren’t as common as they used to be.

  • Beware driveways: When running on pavements, stay alert for cars reversing from drives.

  • Take a running mate: If you are concerned about isolated routes, always run with someone else.

  • Make your route known: It is always best to let someone know roughly where you are intending to go and how long you are likely to be.

  • Make a noise: A small attack alarm or whistle can be a sensible precaution.

    running made easy, whistle

  • Pay attention: It is all too easy to allow a car to pass, only to step out in front of a second vehicle. Stay alert.

  • Carry identification: This is vital in case of an emergency – consider something as simple as writing your phone number inside a shoe; paramedics will know to check.

  • ICE: If you carry a mobile phone, enter a contact as ICE (In Case of Emergency) with a relevant contact number – again, paramedics know to check for this.

  • Rights of way: Always check on a map for rights of way, as online satellite maps can be (literally) misleading.

  • Silent cyclists: Cyclists make little noise, but an impact with one can be as devastating as with a car. Stay alert on likely cycle routes.

running made easy, paths, cycle routes

This post is based on an extract from our bestselling book, Running by Justin Bowyer (ISBN: 9780857753892) – where you can find more on the above and further help and advice on running. Have a look on amazon by clicking here.

Links

  • Have a look at some running tips for beginners here.

  • Live in the city? Check out city running routes in your area here.

  • To keep up-to-date on our latest posts and download a free Made Easy ebook click the link below and sign up.

Expert advice made easy, blogging, photoshop, social media, twitter

Topics: running equipment, Expert Advice, running tips, running advice, running

Running Made Easy: The Anatomy of a Shoe

Posted by Matt Knight

made easy, running tips,

As winter recedes in wake of spring, you may find yourself willing to venture outside and get in shape for the summer. With useful tips and hints taken from our expert advice Made Easy series, let us help you prepare for your outdoor fitness plans. 

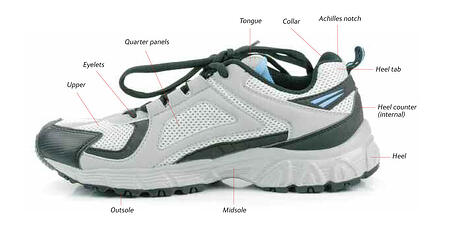
Modern running shoes are precision-built from a large number of individual components, each designed to perform a specific function and to work in harmony with each other. Manufacturers’ websites should detail all the technical aspects of their shoes. Our expert advice made easy helps translate this information into simple, digestable information.

Jargon-buster

Here are some of the main terms you will find when researching running shoes.

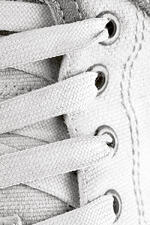
  • Eyelets: The holes that the laces run through.

  • Heel: The first point of contact for many runners. The heel is often rounded to aid forward motion and may be made of a variety of materials, from gel to air pockets.

  • Collar: The soft inside top rear of the shoe that supports the ankle and provides protection for the Achilles tendon.

  • Heel counter: A rigid, moulded support inside the shoe that cradles the heel.

  • Heel tab: This extends upwards from the heel counter at the rear of the shoe to hold the heel firmly in place. It often has a cutout area called an ‘Achilles notch’ to reduce direct pressure on the Achilles tendon.

  • Midsole: This provides primary protection from the impact force of each foot strike. Although the midsole is usually made of foam, some manufacturers use special gels or air pockets.made easy, running tips,

  • Outsole: The outsole is the bit that hits the ground (normally after the heel); it both provides structure to the shoe and gives traction on the running surface.

  • Quarter panels: These are the sides of the shoe. They may include a small piece of mesh to reduce weight and add ventilation.

  • Footbed: A removable insert that helps the shoe to fit snugly. It can usually be removed to aid drying.

  • Tongue: The tongue sits between the laces and the upper foot. It may be ‘gusted’ (connected at the sides) to reduce the amount of water that can get in.

  • Upper: This is the top part of the shoe that encases the foot. Like the quarter panels, these may incorporate a degree of mesh venting.

The Three Main Types

Besides specialist track shoes (with spikes), there are only three main types of shoe from which to choose: road, trail and the relatively new phenomenon of barefoot shoes. Each is designed for a specific purpose, so bear this in mind when making your decision. Seek impartial advice on the pros and cons of manufacturers and the latest designs by looking in running magazines and online forums.

Road Shoes

made easy, running tips,
Road shoes are especially designed for running on hard surfaces. Some may be suitable for a small amount of trail or off-road running, but the quickest way to destroy your shoes is by using them for anything other than their intended purpose. The road shoes you choose will depend on a wide range of variables, the most important of which is your natural running style. This should be checked and advised upon by a specialist retailer.

Avoid Fashion

The price of road shoes varies enormously, but expect to pay anything from £40/$60 to in excess of £100/$160. To some degree, you get what you pay for, but do not be fooled into simply thinking that the more you pay, the better the shoe. There is more than a dash of fashion in running, and you will always pay a premium for the big-name shoes and the latest designs. Many of these will be packed with a multitude of technical-sounding extras that often serve little purpose for the majority of day-to-day running.

Trail Shoes


running made easy
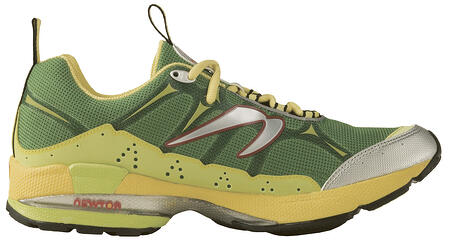
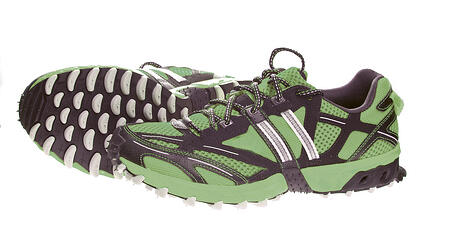
Trail shoes not only have to fulfil your basic needs in terms of cushioning and stability, they also have to perform a number of additional tasks, including protecting the toe and sole from uneven surfaces and delivering enhanced traction for wet and muddy conditions.

running made easy

Getting a Grip

Trail running inevitably means uneven and often wet terrains; your shoes need to be up to the job of keeping you upright and providing enough traction to move you forward. Different manufacturers use a range of tread styles to achieve this, ranging from quite flat car tyre-style treads to large studs (or ‘lugs’) or even additional metal spikes. Low-profile treads provide good all-round traction, but they are unlikely to stand up to the very worst conditions. Conversely, shoes with really large lugs (resembling football boots) will handle more gruelling terrain but can skid on firmer or more compact surfaces.

Trail shoes with low-profile lugs will allow some degree of road running to get you to the start of your off-road route. If you are likely to be running multi-terrain – a mix of trail, path and road – then choose a pair without large lugs.

Barefoot Shoes

running made easy
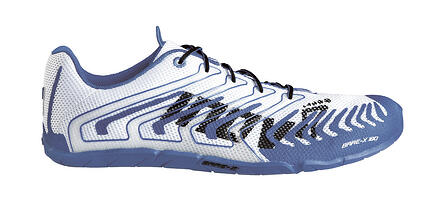
Nothing sounds more contradictory than a barefoot shoe, but over the last few years this running revolution has been transformed from a niche market – initially written off by many as a fad – to a massive industry with growing scientific backing. One of the sparks that ignited this quantum leap in shoe design was Christopher McDougall’s book Born to Run, a highly recommended read even for the most novice runner.

Natural Style

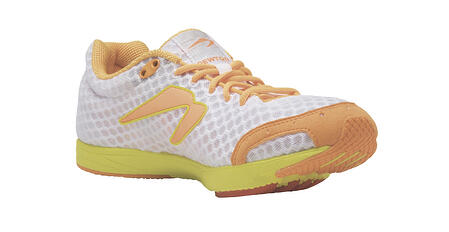
Barefoot shoes are little more than gloves for the feet, providing minimum padding against underfoot forces and, crucially, having no built-up heel, to encourage a more mid- to forefoot running style. This, proponents claim, is a more ‘biomechanically efficient’ way of running, far more in line with the way we were intended to run in an evolutionary sense. Research certainly seems to support this claim, and barefoot runners are undeniably evangelical about the advantages.

Links

  • Are you one of the ten types of runner often seen on the road?

  • You might enjoy this funny running story.

  • To keep up-to-date on our latest posts and download a free Made Easy ebook click the link below and sign up.

Expert advice made easy, blogging, photoshop, social media, twitter

Topics: running equipment, Expert Advice, expert advice made easy, running tips, running advice, running

Cycling Made Easy: Replacing a Worn Chain

Posted by Matt Knight

cycling made easy, cycling tipsChains will wear and ‘stretch’ over time, especially if not lubricated regularly. This can wear down the chainrings and cogsets leading to chain slippage, poor performance and possible accidents. In the next of our series on Cycling Expert Advice, Made Easy, we look at how to replace a worn chain.

Checking the Chain for Wear

Wear on the chain is caused by dirt getting into its joints, combined with the constant friction of contact with the sprockets. A chain wear indicator tool can be bought for less than £10, but you can simply use a ruler instead. Each chain link is made exactly half an inch long, so 12 inches from the centre of a link pin should be the centre of the 24th pin along. If the chain is longer by more than 1⁄16 inch, then it is time to replace it.

cycling made easy, measure chain

Replacing a Worn Chain

Check to see if the chain has a quick-release link (also called a snap link), which is a special type of link that can be fitted and removed without a chain tool. It looks different to the other links. If it does, you can pop it off by hand or with a screwdriver or other tool.cycling made easy, chain tool

Failing that, you will need to use a chain tool as follows:

  1. Place the bicycle on your work stand or lean it against a wall.

  2. Hook a short piece of electrical wire around the links on either side and over the link you are going to break. This will prevent the chain clattering onto the floor and the derailleur kicking up.

  3. Turn the screw handle of the chain tool anticlockwise until it stops. This will retract the chain tool’s pin so that you can fit the chain into the tool and align the chain tool pin with a chain link pin.

  4. Fit the chain tool around a link of chain that you are going to break. There are two slots for this on the chain tool. Use the one furthest from the chain tool handle. Using the nearest slot is for loosening only.

  5. Screw the handle clockwise until the chain tool’s pin touches the chain link pin. Make sure it is aligned and then continue to turn clockwise. There will be resistance but keep going until the pin is pushed out.cycling made easy, chain pin tool

    • If you are removing the chain to clean it and intend to put it back on again, push the link pin a little over half way through and retract the chain tool pin and remove the chain tool. Then take the chain in your hand and twist it a few times; it will come apart with the link pin still fitted in the outer link plate. This will make it easier to reattach by using your chain tool again to push the pin back through the plates.

  6. Your new chain will probably have more links than your old chain so these need to be removed using the chain tool. Before breaking the new chain, make sure you are clear about how the ends fit together. If you are using a pin you need an outer link on one end and an inner link on the other so that you can slot the inner link inside the outer and push the pin through with the chain tool. If you have a quick link (snap link), you need two inner links at either end of the chain as the quick link is an outer.

  7. Place the new chain over the bottom bracket, inside the chainrings, and over the small sprocket at the rear. Align the derailleur and feed the chain over the upper pulley, down and behind and under the lower pulley. Use your electrical wire to link the two ends together.

  8. Align the chain ends and, using the chain tool, screw the pin until it sits neatly through all four plates. Don’t forget to remove the electrical wire.

  9. The new join will be a little stiff, so work the link up and down and side to side a little, then lift the chain off the bracket and feed it onto the lowest chainring from underneath whilst pedalling backwards with your hand.

  10. Lubricate the chain and wipe off any excess.

This post is based on an extract from our bestselling book, Cycling by David North (ISBN: 9780857750969) – where you can find more on the above and further help and advice on Cycling.

Links

  • Check out an interactive map of Britain's best bike rides here.

  • Check out top ten tips to help you winter-proof your bike here.

  • If you want to know more tips and advice on choosing, riding and maintaining a bike, why not buy our Cycling book? Take a look here.

Expert advice made easy, blogging, photoshop, social media, twitter

Topics: Expert Advice, cycling, expert advice made easy, Bicycle maintenance

Cycling Made Easy: Brakes Maintenance

Posted by Matt Knight

cycling made easy, bike riderThere's no point cycling somewhere if you can't stop once you've arrived. In these cold winter months it is important to remain vigilant when maintaining your brakes. Follow our expert advice to ensure your brakes are kept in top condition and can be swapped out should you need to change them. 

Replacing Brake Pads

Release the brakes and remove the old brake pads with a 5-mm Allen key or, if you have cantilever brakes, you will also need an open 10-mm spanner. Fit the new brakes and align them to the wheel rim before tightening.

Replacing Brake Cables

There are two main parts to a brake cable: the inner wire and the outer housing. You can replace them independently of each other but this guide will deal with changing both together.

  1. Slacken the cable pinch bolt and draw the cable through after snipping off the end cap with wire cutters. If you have V-brakes, keep the metal tube (the noodle) and the rubber tube in a safe place as you will need to reuse them.

  2. Unscrew the adjustment barrel next to the brake levers by hand, and line up the slots in the barrel, the locking nut and the brake lever unit. The cable can now be lifted out. cycling made easy, brakes adjustment

  3. Cut your new cable housing (not the inner wire) to the same length as the old one with cable cutters. Attach the metal ferrules (rings) to one end.

  4. Wipe some oil onto the inner wire and slide it into the cable housing.

  5. Hook the nipple into the end of the brake lever and fit the inner cable into the slots in the lever unit and the barrel adjuster.

  6. Feed the other end of the inner cable through its fittings and fit the housing to its relevant attachments on the frame and at its terminals.

  7. Pull the cable tight through the pinch nut then tighten.Resizecycling made easy, brakes cable

  8. Make sure everything is in place and the brakes are centred and aligned. Make fine adjustments by turning the adjustment barrel by hand, then tighten the locking.

  9. Pull firmly on the brake lever several times to bed it in.

  10. When satisfied that all is in place and working properly, cut the free end of the inner wire, allowing some spare. Attach a cable end cap by pinching it over the cable with your pliers.

    cycling made easy, cable end cap

This post is based on an extract from our bestselling book, Cycling by David North (ISBN: 9780857750969) – where you can find more on the above and further help and advice on Cycling.

Links

  • Check out these tips for wet-weather cycling here.

  • For more information on bike maintenance, plus choosing a bike, equipment and clothing and much more, take a look at our book Cycling by David North. For a limited time only we are offering a 30% discount from our website here.

  • To keep up-to-date on our latest posts and download a free Made Easy ebook click the link below and sign up.

Expert advice made easy, blogging, photoshop, social media, twitter

Topics: cycling in cities, expert advice made easy, Bicycle maintenance, bike riding in rain

Cycling Made Easy: Cleaning and Lubricating

Posted by Matt Knight

expert advice made easy, cleaning bikeIt's raining, it's pouring, but there are still some cyclists who brave the road. In weather like this, cycling can be fun and blow away your cobwebs. However, it's important to make sure your bike is maintained to the highest possible standard so that you are safe on the roads. 

Cleaning and lubricating your bike will ensure it is kept in prime condition through the winter weather. Utilise our expert advice made easy and ensure that you clean before you lubricate, especially the chain, as oil will otherwise carry dirt deeper into the moving parts, doing more harm than good.

Cleaning the Frame

  1. Place your bicycle on the work stand, if you have one, or lean it against a wall. 

  2. Wipe the bicycle with warm water except for the chain and the parts it contacts. If the bicycle is very dirty, or for the dirtier areas, you can use a citrus degreaser. Leave it for two minutes and rinse off. Wipe off the moisture with a clean, dry cloth. 

  3. Apply polish or wax to the paintwork and any chrome parts if you wish. Wax will protect the paint and prevent chrome from rusting. Avoid getting harsh cleaning products on the tyres and brake pads. Also avoid getting lubricant or wax on the rims and brake pads.

expert advice made easy, parts of a bike

The Chain Drive

The key area to suffer wear is the chain and those parts it comes into contact with. Dirt is the prime culprit, so cleaning before lubricating is essential. Depending on the type of bicycle you have, there will be different parts with different names so, for the purpose of keeping this simple, I am calling the whole area the ‘chain drive’. This comprises the following:

  • The chain: This connects the pedals to the rear wheel.

  • The chainrings: These are the sprockets (cogs) by the pedals.

  • The cogset: This is the set of sprockets on the rear wheel.

  • Derailleurs: These are the attachments by the chainring and cogset that push the chain from one sprocket to another. 

Cleaning the Chain Drive

Most of the time you can clean this area whilst the chain is on the bicycle. You can buy a special chain cleaning tool if you wish, but the steps below use brushes and cloths.

  1. Place your bicycle on a work stand or upside down if you don’t have one. 

  2. Brush some clean, warm water into the chain and everything it has contact with – the chainrings, cogsets and derailleurs. Hold a damp cloth around the chain and pedal backwards. 

  3. Next make a fold in the cloth and work it, back and forth, in between the sprockets. Don’t expect to get all the dirt off at this stage.expert advice made easy, cleaning the chain

  4. With a clean brush, work some solvent or degreaser into the chain drive. Toothbrushes or nailbrushes are great for the chain, derailleurs and the tops of the sprockets, whilst a longer, stiff-bristled brush is ideal for getting in between the sprockets. Alternatively, use a clean cloth, folded and worked in between the sprockets. 

  5. Using some warm water, a clean brush and a clean cloth, remove any degreaser and dirt, making sure to get in between each chain link and the sprockets.expert advice made easy, lubricating the chain

  6. Finally, dry the whole area, and anywhere else that may have been splashed, with a clean, dry cloth.

This post is based on an extract from our bestselling book, Cycling by David North (ISBN: 9780857750969) – where you can find more on the above and further help and advice on Cycling.

Links

  • Read some further tips on how to be safe when cycling in the winter here.

  • For more information on bike maintenance, plus choosing a bike, equipment and clothing and much more, take a look at our book Cycling by David North here

  • To keep up-to-date on our latest posts and download a free Made Easy ebook click the link below and sign up.

Expert advice made easy, blogging, photoshop, social media, twitter 

Topics: cycling in cities, expert advice made easy, Bicycle maintenance