T H E   F L A M E   T R E E   B L O G

The Expert Advice, Made Easy Blog

Running Made Easy: Staying Safe

Posted by Matt Knight

running made easy, staying safeSafety should be your number-one priority on every run. Running safety is mostly common sense, but even a momentary lapse can spell disaster and taking some simple steps will ensure a safe and happy run.

Consider these helpful pieces of advice from our experts, ensuring your running experience is safe and enjoyable.

  • MP3 players: Only ever listen to music on a run when you are certain it is safe to do so, and never when running in the road.

  • Run against the traffic: If you are running in the road, you are vulnerable. Always run on the side of the road where you are facing oncoming traffic.

  • Be seen: Running at night and in poor visibility means wearing high-visibility clothing and even small clip-on lights. Make yourself as visible as possible.

    running made easy, make yourself visible

  • Stay in contact: When exploring more isolated routes, take a mobile phone. Public phone boxes aren’t as common as they used to be.

  • Beware driveways: When running on pavements, stay alert for cars reversing from drives.

  • Take a running mate: If you are concerned about isolated routes, always run with someone else.

  • Make your route known: It is always best to let someone know roughly where you are intending to go and how long you are likely to be.

  • Make a noise: A small attack alarm or whistle can be a sensible precaution.

    running made easy, whistle

  • Pay attention: It is all too easy to allow a car to pass, only to step out in front of a second vehicle. Stay alert.

  • Carry identification: This is vital in case of an emergency – consider something as simple as writing your phone number inside a shoe; paramedics will know to check.

  • ICE: If you carry a mobile phone, enter a contact as ICE (In Case of Emergency) with a relevant contact number – again, paramedics know to check for this.

  • Rights of way: Always check on a map for rights of way, as online satellite maps can be (literally) misleading.

  • Silent cyclists: Cyclists make little noise, but an impact with one can be as devastating as with a car. Stay alert on likely cycle routes.

running made easy, paths, cycle routes

This post is based on an extract from our bestselling book, Running by Justin Bowyer (ISBN: 9780857753892) – where you can find more on the above and further help and advice on running. Have a look on amazon by clicking here.

Links

  • Have a look at some running tips for beginners here.

  • Live in the city? Check out city running routes in your area here.

  • To keep up-to-date on our latest posts and download a free Made Easy ebook click the link below and sign up.

Expert advice made easy, blogging, photoshop, social media, twitter

Topics: running equipment, Expert Advice, running tips, running advice, running

Running Made Easy: The Anatomy of a Shoe

Posted by Matt Knight

made easy, running tips,

As winter recedes in wake of spring, you may find yourself willing to venture outside and get in shape for the summer. With useful tips and hints taken from our expert advice Made Easy series, let us help you prepare for your outdoor fitness plans. 

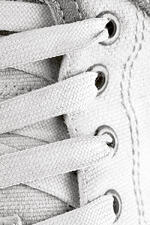
Modern running shoes are precision-built from a large number of individual components, each designed to perform a specific function and to work in harmony with each other. Manufacturers’ websites should detail all the technical aspects of their shoes. Our expert advice made easy helps translate this information into simple, digestable information.
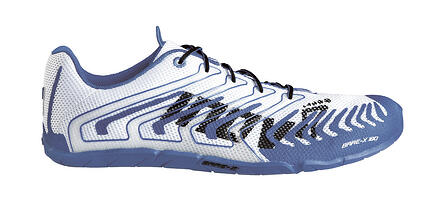
Jargon-buster

Here are some of the main terms you will find when researching running shoes.

  • Eyelets: The holes that the laces run through.

  • Heel: The first point of contact for many runners. The heel is often rounded to aid forward motion and may be made of a variety of materials, from gel to air pockets.

  • Collar: The soft inside top rear of the shoe that supports the ankle and provides protection for the Achilles tendon.

  • Heel counter: A rigid, moulded support inside the shoe that cradles the heel.

  • Heel tab: This extends upwards from the heel counter at the rear of the shoe to hold the heel firmly in place. It often has a cutout area called an ‘Achilles notch’ to reduce direct pressure on the Achilles tendon.

  • Midsole: This provides primary protection from the impact force of each foot strike. Although the midsole is usually made of foam, some manufacturers use special gels or air pockets.made easy, running tips,

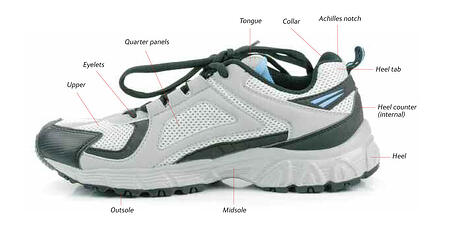
  • Outsole: The outsole is the bit that hits the ground (normally after the heel); it both provides structure to the shoe and gives traction on the running surface.

  • Quarter panels: These are the sides of the shoe. They may include a small piece of mesh to reduce weight and add ventilation.

  • Footbed: A removable insert that helps the shoe to fit snugly. It can usually be removed to aid drying.

  • Tongue: The tongue sits between the laces and the upper foot. It may be ‘gusted’ (connected at the sides) to reduce the amount of water that can get in.

  • Upper: This is the top part of the shoe that encases the foot. Like the quarter panels, these may incorporate a degree of mesh venting.

The Three Main Types

Besides specialist track shoes (with spikes), there are only three main types of shoe from which to choose: road, trail and the relatively new phenomenon of barefoot shoes. Each is designed for a specific purpose, so bear this in mind when making your decision. Seek impartial advice on the pros and cons of manufacturers and the latest designs by looking in running magazines and online forums.

Road Shoes

made easy, running tips,
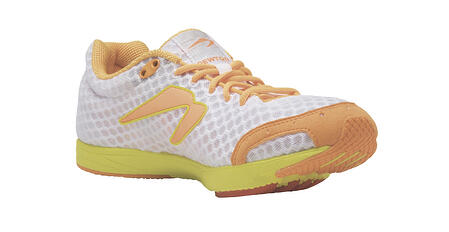
Road shoes are especially designed for running on hard surfaces. Some may be suitable for a small amount of trail or off-road running, but the quickest way to destroy your shoes is by using them for anything other than their intended purpose. The road shoes you choose will depend on a wide range of variables, the most important of which is your natural running style. This should be checked and advised upon by a specialist retailer.

Avoid Fashion

The price of road shoes varies enormously, but expect to pay anything from £40/$60 to in excess of £100/$160. To some degree, you get what you pay for, but do not be fooled into simply thinking that the more you pay, the better the shoe. There is more than a dash of fashion in running, and you will always pay a premium for the big-name shoes and the latest designs. Many of these will be packed with a multitude of technical-sounding extras that often serve little purpose for the majority of day-to-day running.

Trail Shoes


running made easy
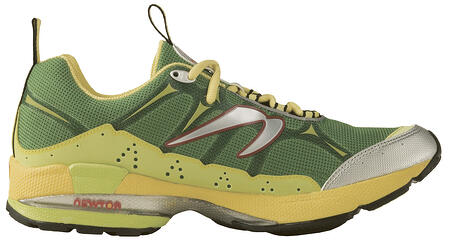
Trail shoes not only have to fulfil your basic needs in terms of cushioning and stability, they also have to perform a number of additional tasks, including protecting the toe and sole from uneven surfaces and delivering enhanced traction for wet and muddy conditions.
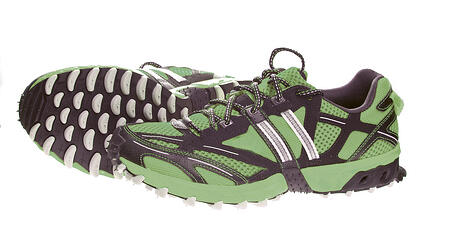
running made easy

Getting a Grip

Trail running inevitably means uneven and often wet terrains; your shoes need to be up to the job of keeping you upright and providing enough traction to move you forward. Different manufacturers use a range of tread styles to achieve this, ranging from quite flat car tyre-style treads to large studs (or ‘lugs’) or even additional metal spikes. Low-profile treads provide good all-round traction, but they are unlikely to stand up to the very worst conditions. Conversely, shoes with really large lugs (resembling football boots) will handle more gruelling terrain but can skid on firmer or more compact surfaces.

Trail shoes with low-profile lugs will allow some degree of road running to get you to the start of your off-road route. If you are likely to be running multi-terrain – a mix of trail, path and road – then choose a pair without large lugs.

Barefoot Shoes

running made easy
Nothing sounds more contradictory than a barefoot shoe, but over the last few years this running revolution has been transformed from a niche market – initially written off by many as a fad – to a massive industry with growing scientific backing. One of the sparks that ignited this quantum leap in shoe design was Christopher McDougall’s book Born to Run, a highly recommended read even for the most novice runner.

Natural Style

Barefoot shoes are little more than gloves for the feet, providing minimum padding against underfoot forces and, crucially, having no built-up heel, to encourage a more mid- to forefoot running style. This, proponents claim, is a more ‘biomechanically efficient’ way of running, far more in line with the way we were intended to run in an evolutionary sense. Research certainly seems to support this claim, and barefoot runners are undeniably evangelical about the advantages.

Links

  • Are you one of the ten types of runner often seen on the road?

  • You might enjoy this funny running story.

  • To keep up-to-date on our latest posts and download a free Made Easy ebook click the link below and sign up.

Expert advice made easy, blogging, photoshop, social media, twitter

Topics: running equipment, Expert Advice, expert advice made easy, running tips, running advice, running

Cycling Made Easy: Replacing a Worn Chain

Posted by Matt Knight

cycling made easy, cycling tipsChains will wear and ‘stretch’ over time, especially if not lubricated regularly. This can wear down the chainrings and cogsets leading to chain slippage, poor performance and possible accidents. In the next of our series on Cycling Expert Advice, Made Easy, we look at how to replace a worn chain.

Checking the Chain for Wear

Wear on the chain is caused by dirt getting into its joints, combined with the constant friction of contact with the sprockets. A chain wear indicator tool can be bought for less than £10, but you can simply use a ruler instead. Each chain link is made exactly half an inch long, so 12 inches from the centre of a link pin should be the centre of the 24th pin along. If the chain is longer by more than 1⁄16 inch, then it is time to replace it.

cycling made easy, measure chain

Replacing a Worn Chain

Check to see if the chain has a quick-release link (also called a snap link), which is a special type of link that can be fitted and removed without a chain tool. It looks different to the other links. If it does, you can pop it off by hand or with a screwdriver or other tool.cycling made easy, chain tool

Failing that, you will need to use a chain tool as follows:

  1. Place the bicycle on your work stand or lean it against a wall.

  2. Hook a short piece of electrical wire around the links on either side and over the link you are going to break. This will prevent the chain clattering onto the floor and the derailleur kicking up.

  3. Turn the screw handle of the chain tool anticlockwise until it stops. This will retract the chain tool’s pin so that you can fit the chain into the tool and align the chain tool pin with a chain link pin.

  4. Fit the chain tool around a link of chain that you are going to break. There are two slots for this on the chain tool. Use the one furthest from the chain tool handle. Using the nearest slot is for loosening only.

  5. Screw the handle clockwise until the chain tool’s pin touches the chain link pin. Make sure it is aligned and then continue to turn clockwise. There will be resistance but keep going until the pin is pushed out.cycling made easy, chain pin tool

    • If you are removing the chain to clean it and intend to put it back on again, push the link pin a little over half way through and retract the chain tool pin and remove the chain tool. Then take the chain in your hand and twist it a few times; it will come apart with the link pin still fitted in the outer link plate. This will make it easier to reattach by using your chain tool again to push the pin back through the plates.

  6. Your new chain will probably have more links than your old chain so these need to be removed using the chain tool. Before breaking the new chain, make sure you are clear about how the ends fit together. If you are using a pin you need an outer link on one end and an inner link on the other so that you can slot the inner link inside the outer and push the pin through with the chain tool. If you have a quick link (snap link), you need two inner links at either end of the chain as the quick link is an outer.

  7. Place the new chain over the bottom bracket, inside the chainrings, and over the small sprocket at the rear. Align the derailleur and feed the chain over the upper pulley, down and behind and under the lower pulley. Use your electrical wire to link the two ends together.

  8. Align the chain ends and, using the chain tool, screw the pin until it sits neatly through all four plates. Don’t forget to remove the electrical wire.

  9. The new join will be a little stiff, so work the link up and down and side to side a little, then lift the chain off the bracket and feed it onto the lowest chainring from underneath whilst pedalling backwards with your hand.

  10. Lubricate the chain and wipe off any excess.

This post is based on an extract from our bestselling book, Cycling by David North (ISBN: 9780857750969) – where you can find more on the above and further help and advice on Cycling.

Links

  • Check out an interactive map of Britain's best bike rides here.

  • Check out top ten tips to help you winter-proof your bike here.

  • If you want to know more tips and advice on choosing, riding and maintaining a bike, why not buy our Cycling book? Take a look here.

Expert advice made easy, blogging, photoshop, social media, twitter

Topics: Expert Advice, cycling, expert advice made easy, Bicycle maintenance

Photoshop Masterclass: Image Clean-Up: Rupert Bear

Posted by Esme Chapman

Art calendars, photoshop, Rupert Bear

Expert advice made easy: here at Flame Tree we create, design and edit a wide range of calendars, diaries, illustrated books and ebooks. Sometimes we make artwork ourselves, or commission it from artists, or search through picture libraries. However, for classic licenses like Rupert the Bear we have to find the originals ourselves, clear the copyright, scan them and clean them up. We've been doing this for over 20 years.

Rupert Bear has become somewhat of a classic, and has built up a sizeable and rather dedicated following over the years. As a result, many Rupert fans are keen to get their hands on merchandise featuring this wise and thoughtful chap and his host of colourful animal friends. Little do they know, creating these shiny, new products isn't always straightforward and can require some amount of tweaking and cleaning up of the original Rupert images, which were collated into annuals cherished by hoards of children.

I spoke to Jane (Ashley), a designer at Flame Tree and life-long Rupert fan, about how she chooses and cleans up Rupert images ready for use in our Flame Tree calendars and Flame Tree diaries. 

1. Choosing the image – Firstly Jane scours through her considerable collection of old Rupert annuals to find an image she thinks might work. She is looking for a good all-round picture which is large enough that it can be wrapped around a diary cover, including the spine, such that for each year the cover image of the calendar and diary are matching. Jane is of course looking for an image where Rupert is clearly the centre of attention, but is accompanied by a decent number of his loyal buddies. In this case she went for the cover of the 1969 annual, and scanned it in ready to start the clean-up work in Photoshop.
 

1969 Rupert Annual Cover

 
2. Correcting the colours – Having lovingly selected her image, Jane begins the clean-up process with a touch of colour correcting. To do this she selects the 'Curves' tool from the 'Adjustments' menu...
 
Screen Shot 1 Curves resized 600
 
...and alters the curve to make the colours sharper and smoother, experimenting a little to get a good balance which ensures that Rupert and friends look their best (screen shots of this are shown below).
 
Screen Shot1 curves resized 600
 
3. De-wrinkling – Next, Jane gives Rupert a bit of a facelift by using the 'Spot Healing' tool to clean up any uneven lines on the images which may have arisen through the aging process. In particular she looks for any subtle unwanted lines resulting from creases on the pages – yes, books get wrinkles too! In the screenshot below the large black smudge shows where Jane stroked her magic healing tool.
 
Screen Shot 4 healing brush resized 600
 
4. Removing the text – So that the image can be used as a calendar or diary cover, rather than still looking like an annual cover, Jane removes the pre-existing text. To do this she uses the 'Cloning' tool, which covers up the text with the same colours and textures as the surrounding image – pretty magical! Below you can see Jane cloning away the 'T' from 'Rupert'.
 
Screen Shot5 Cloning out Rupert resized 600
 
5. Bye bye spine – Finally Jane takes her magic cloning tool to work on that unsightly black line running through the image (a result of where the spine was in the original annual). This part can be tricky to get right and Jane is careful to make sure that she matches the colours and patterns convincingly. The screen shot below shows the cloning work which Jane did on the top squirrel – just compare him to how he looks in the previous screen shot... he is no longer having his head cut off by that black line!
 
Screen Shot 6 cloning spine resized 600
 
And there you have it – a shiny new Rupert image. See the 'after' shot below, all cleaned up and ready to be used for calendar and diary cover images. Good work Jane!
 
Rupert1969 coverDiaryFinish resized 600
 
Links
  • For some cool tutorials on Photoshop, take a look at Youtube here.

  • For information on the copyright / licensing of Rupert and others, here.

  • Great reviews of our Rupert Calendars on Amazon (Thank you!), here.

We'll be sharing some more techniques and tips over the coming months. Let us know below if you have any areas you'd like covering. Thank you.

Expert advice made easy, blogging, photoshop, social media, twitter

Topics: Expert Advice, made easy, Photoshop Masterclass, Rupert Bear, Flame Tree Calendars, Flame Tree Diaries