Most websites contain a lot more than just text. Images, video and audio can greatly increase your visitor numbers and encourage them to stay longer. Advanced HTML5 features such as geolocation can improve your site’s interactions with your visitors and, of course, adding a sprinkle of visual polish is always a good idea.
Alongside text, images are the element that almost every website has in common. Very rarely will you find a contemporary website with a total lack of imagery. Images are extremely versatile and have the potential to make a website much more visually appealing.
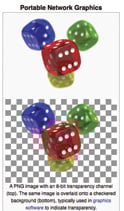 Image Formats
Images come in a variety of formats, but on the web there are effectively three formats used: GIF, PNG and JPG. The GIF format is a hangover from the early days of the web and is becoming increasingly uncommon. PNG and JPG, on the other hand, are widely used. Both have specific advantages and disadvantages, but together they can satisfy all situations.
The PNG Format
PNG (Portable Network Graphics, pronounced ‘ping’) is the best option for graphics (as opposed to photo-based imagery) because typically they use lossless compression and so offer better sharpness and accuracy than JPG. Their other benefit is that they support transparency. This means that a PNG image needn’t have a solid-coloured background, and that anything behind them can show through the transparent areas of the PNG.
The JPG Format
The JPG format (also known as JPEG, pronounced ‘jay-peg’) uses a complex image compression technique to reduce the file size of an image without visibly degrading it. This means that the images can be saved at different quality levels to reduce the file size of an image. The higher the level, the better the quality, but the larger the file size; the developer can choose where to strike the balance. JPGs don’t support transparency and so are not as suitable for graphics.
- Hot Tip: When creating images and graphics, work from a full quality editable version in a lossless format such as PSD (Photoshop’s native format), then export the graphics you need as PNG or JPG files.
Adding Images
The addition of images to a web page is a relatively simple process. However, before adding an image, it is a good idea to store your images in a sub-folder of your site root.
The <img> Element
When adding images to a page we use the <img> element. This is a self-closing element, meaning that, you will recall, they only have an opening tag and no closing tag, and can’t have any content nested within them.

When defining more than a couple of attributes, it’s not unusual to split them into separate indented lines, making them easier to read.
How to Add an Image
1. Locate your site folder and create a subfolder within it; name the subfolder ‘images’.
2. Find a suitable image. Use your image editor to resize it to 700 pixels wide and whatever height is proportional to that width for your chosen image. Save a copy of the image into the folder we have just created, using the JPG format. Name the file homepageImage.jpg.
3. Open your site’s homepage (index. html) in your text or HTML editor, and locate the <h2> element that’s at the top of the <section> element. Create an empty line in the HTML, above the <h2> element.
4. Now add the <img> element as shown in the illustration (right). The name attribute value will be displayed in place of the image if the browser is unable to load it, whilst the alt attribute value is the text that is shown if the user hovers the mouse pointer above the image. The src attribute value is the URL of the image to use (note we’re using a relative URL).
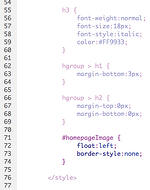
5. We’re going to create a style rule for the image, so find the <style> element in the <head> of your page. Add the code shown in the illustration. Note that we’re using an ID selector so that we target only our newly added <img> element. Save your work and be sure to view the results in your web browser.

This is just one example of a simple piece of expert advice that you can expect from our title Coding HTML & CSS Basics. As well as providing help for newcomers to coding, we've packed our book with information for people that have taken their skills up to an intermediate level. So, if you're looking for a great resource to help you learn, then master the art of coding, looking no further than our title. Click here to take a closer look at the book. To see it on Amazon, click here.
- If you're looking to get a handle on the confusing coding terminology, just click here for a helpful article.