Summer is here, the school holidays have started – but how to keep your children entertained? Well here are some really fun and creative projects you can do, all using the magic of bicarbonate of soda (or alternatively you can use baking soda) – that handy substance you might just have lying around in the cupboard.
Clay
Your children will love making this easy-to-mould clay. It is safe to use and the ingredients are so cheap – certainly much less than most proprietary brands of clay. The children can add food colouring to it if they wish at the very beginning of the project, or they can also decorate it with paint, felt-tip pens or watercolour pens after they have formed their shapes. This simple recipe makes a good-sized piece of bicarbonate of soda clay.
You Will Need
- 1 large box (400 g/14 oz/2 cups) bicarbonate of soda
- 100 g/7 oz/1 cup cornflour
- 250 ml/8 fl oz/1 cup water
- 1 tbsp vegetable oil
Method
1. Place all the ingredients into an old saucepan. You can add the food colouring of your children’s choice at this stage, or you can wait and colour at the end.
2. Heat the mixture very slowly, stirring all the time, until the mixture becomes thick and uniform in shape. The heating stage usually takes about 15 minutes or so on a low heat.
3. When the mixture is the right consistency, pour it out of the saucepan and on to an old plate.
4. Cover the clay with a damp cloth and leave it to cool for about an hour.
5. Once the clay has cooled enough to be handled, you can sprinkle some more cornflour on to a wooden board and knead the clay, as you would bread, until the clay is smooth.
6. Now you can let the children loose. The clay can be moulded into any shape that your children wish. They can also use their favourite colours to highlight the shapes. Felt-tip pens or watercolour pens are good for this important task.
 Fizzy Sherbert
There is no cooking involved in making this fun fizzy treat for the children, but getting the taste right can be a case of trial and error. The sugar may have to be adjusted to give the right level of sweetness, which varies from person to person, and the same applies to the tartness or lemony-ness of the sherbet.
You Will Need
- 2 tsp caster sugar or icing sugar
- 1 tsp powdered citric acid
- 1⁄2 tsp bicarbonate of soda
Method
1. Mix the ingredients together.
2. Test for sweetness and if necessary add some more sugar.
3. If the sherbet does not taste quite lemony enough, add some more citric acid.
4. If the sherbet isn’t quite fizzy enough on your tongue, then add some more bicarbonate of soda.
You can also vary the flavour of your sherbet when you have this initial ingredient mix just right. But remember that all the ingredients have to be dry, otherwise the sherbet will fizz with any liquid you add before it gets on to your tongue. You could try adding vanilla, coffee, cloves, cinnamon, dry ginger and a host of other dry ingredients.
There are various ways you can eat the sherbet – such as simply spooning it into your mouth with a spoon or shovel-shaped straw – but one of the most enjoyable for children is to dip a lollipop or stick of liquorice into the sherbet.
Mini Rocket
The children will really enjoy this exciting and creative project.
To Make the Rocket, You Will Need
- scissors
- plastic canister with lid – an old 35 mm film cartridge case is ideal
- sheet A4 paper, coloured if preferred
- felt-tip pens or paint (optional)
- sticky tape
Caution: Do be sure the children are supervised, are outside the house and wear some eye protection when you are launching your rocket.
Method
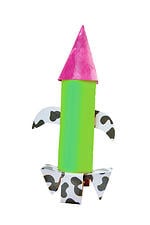
Your children can use their creative talents to make their desired rocket shape using the canister and the paper, by sticking paper ‘wings’ and ‘nose’ on it, for example. Make sure you do not make the rocket too heavy and also ensure your plastic canister has a removable lid. You can make the rocket well in advance of launching it, particularly if the children want to paint or colour their rocket. When you are ready to launch the rocket, it’s time to make the rocket fuel.
To Make the Fuel, You Will Need
- 1⁄2 tsp bicarbonate of soda
- 1⁄2 tsp vinegar
- tissue
Method
You should not allow your bicarbonate of soda and vinegar to mix until you are ready to launch the rocket. But when you are ready, you can:
1. Wrap your bicarbonate of soda in a tissue. Make a parcel that will easily fit inside the lid of your plastic canister.
2. Fix the bicarbonate of soda parcel into the lid of the plastic canister with a little sticky tape. Alternatively, make a paste with the bicarbonate of soda and a little water and pack this into the lid.
3. Pour the vinegar into your plastic canister.
4. Carefully put the lid on to the canister, then turn the canister upside down so that the vinegar soaks through the tissue paper and mixes with the bicarbonate of soda.
When the bicarbonate of soda and the vinegar combine, they will make carbon dioxide gas. This gas will force the plastic canister to pop off the lid. The rocket will launch into the air, so stand back and enjoy!
This is only a small taste of the many uses around the kitchen and home of bicarbonate of soda. The above was an extract from our book Bicarbonate of Soda (ISBN: 9781783612772) by Diane & Jon Sutherland, Liz Keevill & Kevin Ayres. For more handy hints and expert advice, check out the book, available on Amazon here.
Links
-
For more unusual but helpful uses for common household products, try this website
-
The official Arm & Hammer baking soda company offers practical uses for bicarb, including more projects for kids.
-
Want to put bicarb to work in its most common use? Visit this recipe website for lots of baking recipes.


