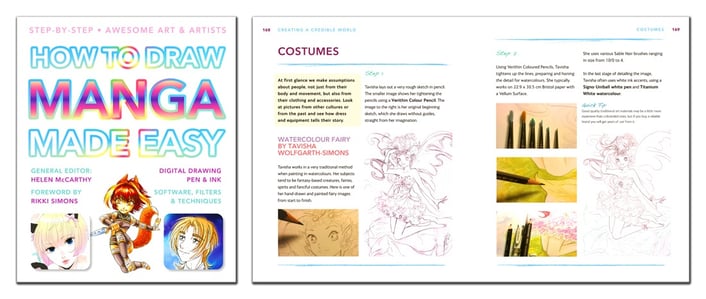
 Our amazing new title How To Draw Manga: Made Easy features loads of informative guides to help improve your drawing skills. Today's blog takes a look at some the helpful advice you can expect, written by our insightful art experts.
Before you start drawing, give the head an egg shape, which can be fatter or thinner depending upon the desired facial types. Oval and heart-shaped faces are conventionally beautiful; round faces are cuter; square faces tend to look distinguished and handsome.
Drawing Heads and Faces
by Sonia Leong
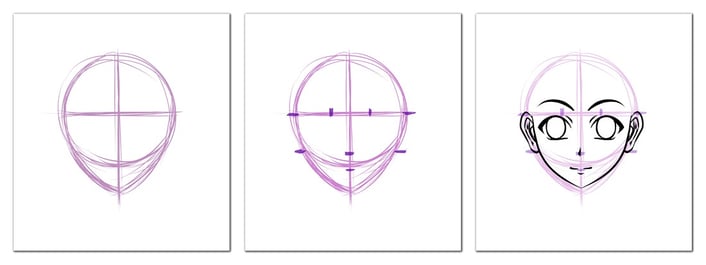
- Step 1 As Manga can exaggerate and minimise some parts of the face more than real life, I find it useful to break the head into two sections, a round, spherical top half and a jaw/chin underneath. I draw a horizontal line across the circle halfway to represent the brow bone, then I add a vertical centre line down the middle and extend it as needed below the circle until I achieve the right face length. Then I join the sides of the circle to the point of the chin to make an egg shaped template.
- Step 2 I add a few key relative measurements to help with placement of the features. The tip of the nose is halfway from the brow bone to the chin, so I place a marker halfway from the cross in the middle to the bottom of the egg. From that nose marker to the chin, divide in half for a mouth marker. The ears are sized and placed in between the brow bone and the nose marker. Finally, the neck should be a minimum of a third of the width of the head and increased to match your character (thicker if male, older, more muscles).
- Step 3 Once you have the template with markers, it’s relatively easy to size and place the facial features. Eyes go below the brow bone, eyebrows go above. The nose is drawn on the nose marker, the mouth at the mouth marker. Ears line up with the brow and the nose.
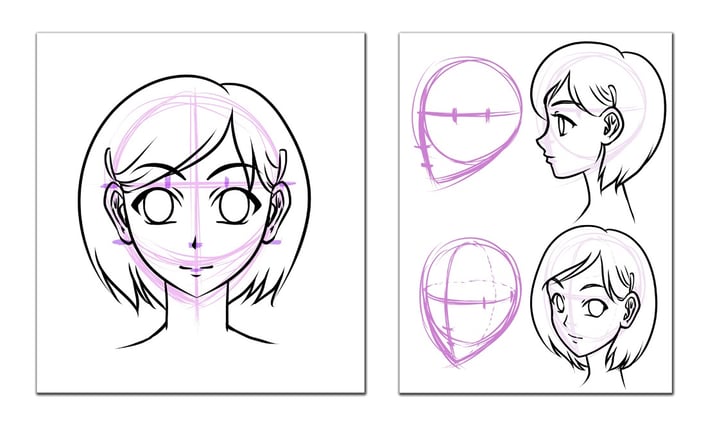
- Step 4 As this is a young female character, I’ve drawn her neck at the minimum width of a third of the head’s width. The finishing touch is hair and it is crucial that it sits well on top of the boundaries of the template, it should cover the top of the head like a wig. If in doubt, go bigger! Hair has volume so it always has to be bigger than the guideline.
- Step 5 You can use the same set of guidelines for other views of the head if you rotate them accordingly. In the side view, the centre line goes down the edge of the circle, but otherwise the nose, mouth and ear markings are all the same. The only addition is that in a side view, the ear is placed two-thirds back on the head. When dealing with three-quarter views and beyond, you have to think about the guidelines in three dimensions; now you can see how the guidelines curve to match the egg shape. The main difficulty here is accounting for perspective; knowing how much to shrink or stretch the features like the eyes will take practice.
Two Faces Have I
by Bruce Lewis
- Step 1 Since both of the girls I want to draw are good-looking (in this case; ugly faces are also fun to draw), I put down two ovals, then sketch in necks and ears. Be sure to create interesting positions for the heads; no one wants to look at police mug shots. To the lightbox!
- Step 2 Centerline and equator go in next. Note (A) that the equator must be at or just a bit above the ear; the pupils will be centered top-to-bottom on this line. Note, too (B), where I adjusted the length of the chin; the equator should (obviously) be halfway down the length of the face as measured from crown to chin. Sketch in basic facial contours here as well.
- Step 3 Lightbox again. My first swipe at the faces. Note that eyes are one eye-width apart and one eye-width (keeping perspective in mind) from the temples. I also sketch in the hair and shoulders.

- Step 4 The image drawing. Here I redraw the image on the ‘box and add in all the details and try to capture the ‘feel’ I want. At this point I’d like to stop drawing, since I find this stage best captures the freshness and energy behind the story I want to tell with this picture. Sadly, however, this sketch is nowhere near complete nor ready to print. Onward!
- Step 5 First clean up. Slicker, but too much like colouring-book art. This drawing needs more verve.
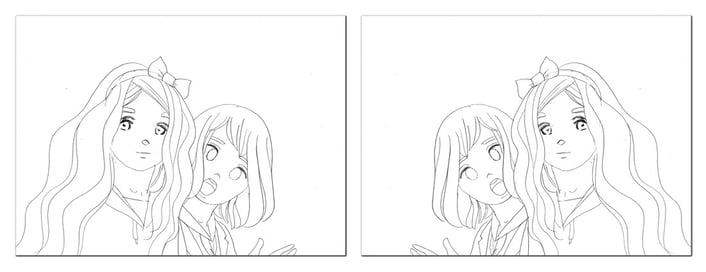
- Step 6 Flip! Turning the drawing over, I use the lightbox to detect errors in anatomy and perspective, e.g., uneven features. I then sketch in corrected anatomy/ perspective on the backside of the paper.

- Step 7 Second clean up. I redraw the corrected, reversed image onto a new sheet of paper. Done carefully, this produces an almost exact (reversed) copy of the first clean up.
- Step 8 The finished piece. The second clean up is flipped and redrawn in pen or (in this case) pencil. Two faces have I, ladies and gents!
For way more information and advice on how to draw manga, make sure you pre-order our upcoming book How To Draw Manga: Made Easy. Full of expert advice, step by step images, and tonnes of helpful examples, this is the perfect title for anyone looking to hone their artistic skills.

