iPhones are amazing. They can do so many things, but when it really comes down to it they are still phones. That means that one of the most essential things you should be able to do is make calls, right? Making calls and sorting contacts isn't rocket science, but on a phone packed with so many other features it might not be immediately clear to the new user. Read on for a quick slice of expert advice and master your contacts in no time.
Adding Contacts
How you add your old contacts on to your new iPhone will depend on where they are stored. The most common ways to achieve this are the following:
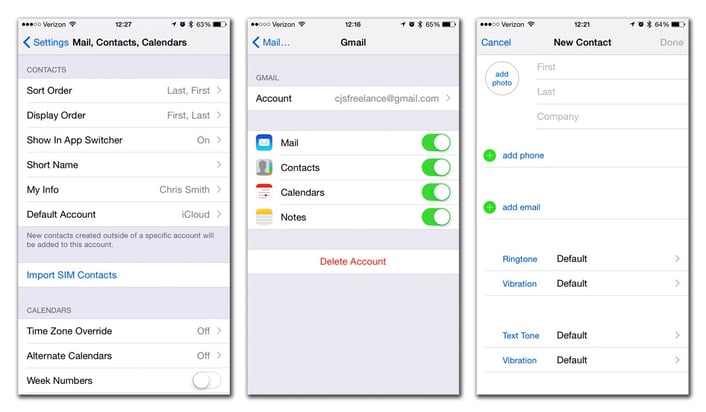
- From a SIM card: Insert the SIM card containing all your contacts into your new iPhone (but remember that iPhone 5 and up require a smaller nano-SIM, so if yours are stored on a regular SIM card, you’ll need to choose an alternative option). Go to Settings > Mail, Contacts, Calendars > Import SIM Contacts.
- Switching from Google Android? You can back up your contacts to your Google account on your old phone. Then go to Settings > Mail, Contacts, Calendars. Add your Google account and you’ll then be given the option to import your contacts.
- From iTunes: Copying contacts from an old iPhone? Simply make an iTunes backup of the old phone. Connect your old phone to iTunes via a USB cable, then right-click on your device in iTunes and select Backup. After that’s complete, connect your new iPhone via USB, right-click on it in iTunes and select Restore from Backup.
- From iCloud: If your old iPhone was running iOS 5 or iOS 6 you can sync your contacts using iCloud. On the old device, go to Settings > iCloud > Storage & Backup and make sure that iCloud is switched on. Then do the same on your new device.
- From a Microsoft Exchange Global Address List: Go to Settings > Mail, Contacts, Calendars, select your Exchange account and turn on Contacts.

That said, you can also import contacts from social media accounts. This is a good idea for social media users, as the iPhone alows you to bundle together contact information - putting numbers, social media accounts and other app info, like Whatsapp details, all in one place.
Import from Facebook
- Activate your Facebook account on your iPhone: open Settings, select Facebook and enter your Facebook account details. In iOS 8, this will automatically download your Facebook friends’ information to the Contacts app.
- Your Facebook friends’ details will automatically be integrated, where available, and a Group called Facebook will be created in your Contacts.
- Tap Update Contacts at any time in Settings > Facebook to ensure the information remains up to date. This will match email addresses in your Contacts to your Facebook friends and match them up.
Import from Twitter
It’s also possible to add your Twitter contacts into your phone Contacts. Once again, be aware that this could mean hundreds of people, depending on how active you are, and you’ll need to merge Twitter entries with people already in your iPhone manually.
- Activate your Twitter account on your iPhone: open Settings, select Twitter and enter your Twitter account details.
- After connecting with Twitter, click Update Contacts. This will place the Twitter contacts into your Contacts. You’ll usually find them under their full name (or what they told Twitter their full name was).
Of course, if you'd prefer to do things yourself you can still add contacts manually. There are two easy ways to do this:
- Brand new contact: From within Contacts, tap the + button. This will bring up a form for you to fill in with the person’s details, such as First Name, Last Name, Phone Number, Email and Address. From here, you can also assign things such as ringtone, text tone and photo, or apply social networking preferences.
- Previous caller: Open your Recent Call list and scroll to the number you wish to add. Tap on the blue arrow next to it and then select ‘Create New Contact’. You can then enter the relevant information.
Searching Contacts
Using the iPhone’s tactile touch screen to scroll rapidly up and down through your Contacts list is probably the most intuitive way to find that person you want to call or email, but there are other shortcuts.
- Jump to contacts by letter: Use the alphabet on the right to quickly view all the names on your list.
- Simple search: Start typing the name of the contact you’re hunting for into the search bar at the top of the screen. Your contacts will automatically filter to display matches.
Sharing Contacts
‘Can you send me their number?’ is a question that gets most people scrabbling through their phonebook, before reading out the answer while someone else taps it into their phone; however, there is a faster way to share contacts. Simply tap the contact you wish to send, tap Share Contact and you can send the info by email, text message or AirDrop.
Favorites
In iPhone speak, your Favorites are the numbers you call the most. Just like speed dial on a normal phone, you can store all the vital numbers you’ll be dialling regularly for easy access and fewer taps, thus saving time when you want to call.

Adding Favorites
It’d be amazing if the iPhone could automatically fill up your Favorites group based on the number of times you’ve called people in your phonebook but, currently, anointing a Favorite is still your choice … Plus, it might be embarrassing to have that takeaway listed at No. 1. There are two methods for adding a new Favorite:
- When you’re viewing a contact: An Add to Favorites button will appear on the screen. Tapping this brings up all of the phone numbers you have stored for that person. You can then select which number to make your Favorite for that contact.
- From within your Favorites: Tap the + symbol in the top-right corner. This brings up your Contacts list where you can choose your new best buddy by following the steps above.
Calling a Favorite
It couldn’t be simpler to phone one of your chosen people: just select the Phone app icon and then select Favorites from the bottom-left corner of the screen. Pick the person you want to call, tap their name and you’re dialling.
Editing Favorites
Managing your existing Favorites is simple. In order to access the full list, simply tap on Contacts from the Home screen and then touch the Favorites button which appears along the bottom of the screen. From there, you will be able to carry out the following actions:
- Delete a Favorite: Press the red circle icon and then tap the Delete button that appears next to your soon-to-be-former Favorite. This won’t delete them from your Contacts – only from the Favorites.
- Reorder your Favorites list: Just press and hold the icon with the three horizontal lines that appears next to the contact’s name. While still holding, drag and drop it into the new position; press Done when you’re finished tweaking the list.
This article is just a sliver of a much more detailed section from our new book iPhone 5C, 5S, 6: Made Easy. With more images that walk you through through the step-by-step advice, this title is the perfect solution for anyone looking to make the most out of their iPhone. Take a closer look at the book on our wesbite. Or, click here for Amazon.


